Lucius's Blog

Vue.js 组件

介绍

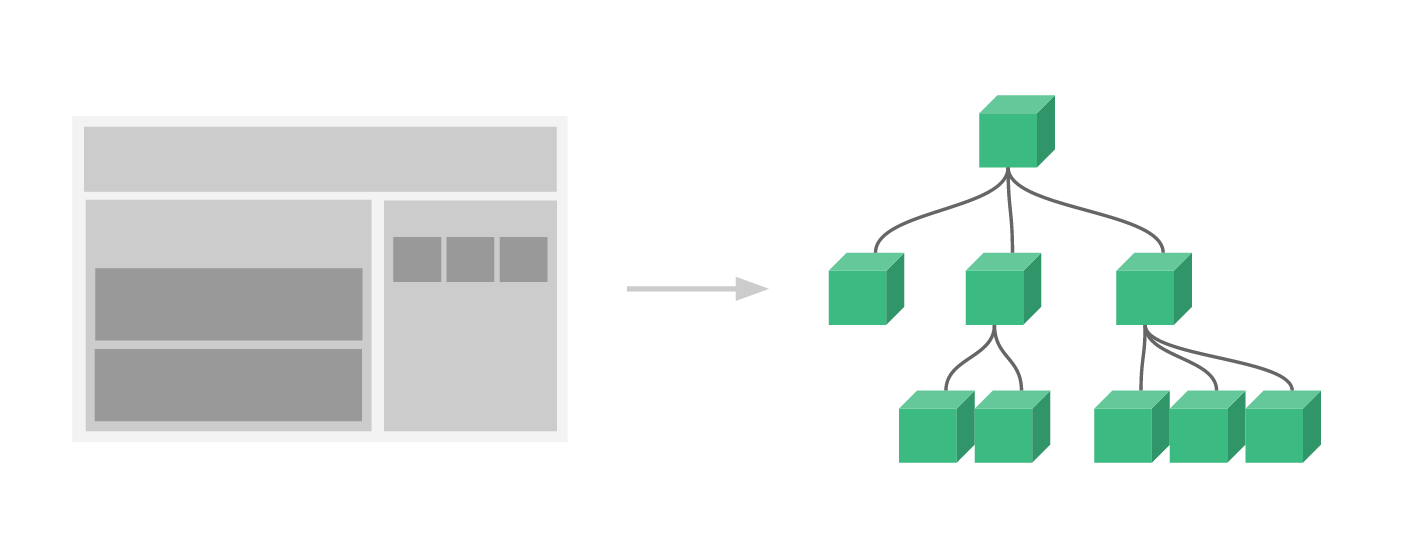
组件(Component)是 Vue.js 最强大的功能之一。组件可以扩展 HTML 元素,封装可重用的代码。在较高层面上,组件是自定义元素, Vue.js 的编译器为它添加特殊功能。在有些情况下,组件也可以是原生 HTML 元素的形式,以 is 特性扩展。
注册

全局注册

Vue.component(tagName, options)

如:

1
2
3
4
5
6
7
8
9
10
11
12
// 创建组件构造器
var myComponent = Vue.extend({
template: '#template'
})

// 注册组件
Vue.component('my-component', myComponent)

// 在Vue实例作用范围内使用组件
new Vue({
el: '#app'
})

局部注册

通过使用组件实例选项注册,可以使组件仅在另一个实例/组件的作用域中可用:

1
2
3
4
5
6
7
8
9
10
var Child = {
template: '<div>A custom component!</div>'
}
new Vue({
// ...
components: {
// <my-component> 将只在父模板可用
'my-component': Child
}
})

data

组件的data必须是函数

1
2
3
4
5
6
7
8
9
10
11
12
13
var data = { a : 1}

// wrong
var c1 = Vue.extend({
data: data
})

// right
var c2 = Vue.extend({
data () {
return { a : 1}
}
})

协同工作

在 Vue.js 中,父子组件的关系可以总结为 props down, events up 。父组件通过 props 向下传递数据给子组件,子组件通过 events 给父组件发送消息。

props

组件实例的作用域是孤立的,props是单向的,只能由父组件传递给子组件,反之则会报错。

1
2
3
4
5
6
7
8
9
Vue.component('child', {
// 声明 props
props: ['message'],
// 就像 data 一样,prop 可以用在模板内
// 同样也可以在 vm 实例中像 “this.message” 这样使用
template: '<span>{{ message }}</span>'
})

<child message="hello!"></child>

结果

1
<span>hello</span>

注意:

1、html不区分大小写,prop会从 camelCase转为 kebab-case

1
2
3
4
5
6
7
8
9
10
Vue.component('child', {
// camelCase in JavaScript
props: ['myMessage'],
template: '<span>{{ myMessage }}</span>'
})

// ===>>

<!-- kebab-case in HTML -->
<child my-message="hello!"></child>

2、动态prop

可以用v-bind动态绑定props的值到父组件的数据中。

1
2
3
4
5
<div>
<input v-model="parentMsg">
<br>
<child v-bind:my-message="parentMsg"></child>
</div>

3、字面量vs动态语法

1
2
3
4
<!-- 传递了一个字符串"1" -->
<comp some-prop="1"></comp>
<!-- 传递实际的数字 -->
<comp v-bind:some-prop="1"></comp>

4、改变组件prop值

定义一个局部 data 属性,并将 prop 的初始值作为局部数据的初始值。

1
2
3
4
props: ['initialCounter'],
data: function () {
return { counter: this.initialCounter }
}

prop 作为需要被转变的原始值传入,定义一个 computed 属性,此属性从 prop 的值计算得出

1
2
3
4
5
6
props: ['size'],
computed: {
normalizedSize: function () {
return this.size.trim().toLowerCase()
}
}

5、prop 检测

prop 可以添加检测机制,目前 type 有StringNumberBooleanFunctionObjectArray,也可以自定义类型,使用instanceof检测。

1
2
3
4
5
6
7
8
9
10
11
12
13
14
15
16
17
18
19
20
21
22
23
24
25
26
27
28
29
30
31
Vue.component('example', {
props: {
// 基础类型检测 (`null` 意思是任何类型都可以)
propA: Number,
// 多种类型
propB: [String, Number],
// 必传且是字符串
propC: {
type: String,
required: true
},
// 数字,有默认值
propD: {
type: Number,
default: 100
},
// 数组/对象的默认值应当由一个工厂函数返回
propE: {
type: Object,
default: function () {
return { message: 'hello' }
}
},
// 自定义验证函数
propF: {
validator: function (value) {
return value > 10
}
}
}
})

自定义事件

$on(eventName)监听事件

$emit(eventName)触发事件

1
2
3
4
5
6
7
8
9
10
11
12
13
14
15
16
17
18
19
20
21
22
23
24
25
26
27
28
29
30
31
<div id="counter-event-example">
<p>{{ total }}</p>
<!-- 监听事件:increment,监听函数:incrementTotal -->
<button-counter v-on:increment="incrementTotal"></button-counter>
</div>

Vue.component('button-counter', {
template: '<button v-on:click="increment">{{ counter }}</button>',
data: function () {
return {
counter: 0
}
},
methods: {
increment: function () {
this.counter += 1
this.$emit('increment') // 抛出事件
}
},
})
new Vue({
el: '#counter-event-example',
data: {
total: 0
},
methods: {
incrementTotal: function () {
this.total += 1
}
}
})

若想绑定原生事件,可以用.native修饰v-on

1
<my-component v-on:click.native="doTheThing"></my-component>

slot(内容分发)

1
2
3
4
<app>
<app-header></app-header>
<app-footer></app-footer>
</app>

1、<app> 组件不知道它的挂载点会有什么内容。挂载点的内容是由<app>的父组件决定的。

2、<app> 组件很可能有它自己的模版。

编译作用域

1
2
3
4
5
6
<child-component>
{{ message }} // message 的数据是绑定在父组件而非子组件
</child-component>

<!-- 无效 -->
<child-component v-show="someChildProperty"></child-component>

上面例子出现无效的原因是:假定 someChildProperty 是子组件的属性,上例不会如预期那样工作。父组件模板不应该知道子组件的状态。

如果要绑定子组件内的指令到一个组件的根节点,应当在它的模板内这么做:

1
2
3
4
5
6
7
8
9
Vue.component('child-component', {
// 有效,因为是在正确的作用域内
template: '<div v-show="someChildProperty">Child</div>',
data: function () {
return {
someChildProperty: true
}
}
})

slot简单来说就在包装在子组件里的其他元素。

1
2
3
4
5
6
7
8
9
10
11
12
13
14
15
16
17
18
19
20
<!-- 组件模板 -->
<div class="container">
<header>
<slot name="header"></slot>
</header>
<main>
<slot></slot>
</main>
<footer>
<slot name="footer"></slot>
</footer>
</div>

<!-- 父组件模板 -->
<app-layout>
<h1 slot="header">这里可能是一个页面标题</h1>
<p>主要内容的一个段落。</p>
<p>另一个主要段落。</p>
<p slot="footer">这里有一些联系信息</p>
</app-layout>

渲染结果为:

1
2
3
4
5
6
7
8
9
10
11
12
<div class="container">
<header>
<h1>这里可能是一个页面标题</h1>
</header>
<main>
<p>主要内容的一个段落。</p>
<p>另一个主要段落。</p>
</main>
<footer>
<p>这里有一些联系信息</p>
</footer>
</div>

动态组件

使用保留的 <component> 元素,动态地绑定到它的 is 特性:

1
2
3
4
5
6
7
8
9
10
11
12
13
14
15
var vm = new Vue({
el: '#example',
data: {
currentView: 'home'
},
components: {
home: { /* ... */ },
posts: { /* ... */ },
archive: { /* ... */ }
}
})

<component v-bind:is="currentView">
<!-- 组件在 vm.currentview 变化时改变! -->
</component>

keep-alive

切换出去的组件保留在内存中,可以保留它的状态或避免重新渲染。

1
2
3
4
5
<keep-alive>
<component :is="currentView">
<!-- 非活动组件将被缓存! -->
</component>
</keep-alive>

学习参考文章(v1.0):

我只是试下能不能被赞赏😳